Auto-generate Flow Chart from Java/C++ Codes:

Raptor Flowchart Tutorial For Beginners

Wednesday, March 28, 2012

Linux-Active Directory Integration with Windows Server 2008


In the event that your organization is considering a migration later this year (or next?) to Windows Server 2008 (formerly “Longhorn”), here are some instructions for integrating Linux login requests against Active Directory on Windows Server 2008. These instructions are based on Linux-AD Integration, Version 4 and utilize Kerberos, LDAP, and Samba.

When this process is complete, AD users can be enabled for use on Linux systems on the network and login to those Linux systems using the same username and password as throughout the rest of Active Directory.

If you are looking for information on using Linux with a previous version of Windows before Windows Server 2008, please refer back to my AD integration index and select the appropriate article. The only significant changes in the process involve the mapping of the LDAP attributes; otherwise, the procedure is very similar between the two versions of Windows.

PREPARING ACTIVE DIRECTORY (ONE-TIME)

The process of installing and configuring Windows Server 2008 is beyond the scope of this article (although I may touch on that in the near future in a separate article). Therefore, I won’t provide detailed instructions on how to perform some of these tasks, but instead provide a high-level overview.

Enable Editing/Display of UNIX Attributes

In order to store UNIX attributes in Active Directory, the schema must be extended. To extend the schema, first install Active Directory (add the Active Directory Domain Services role to an installed server, then use the Active Directory Installation Wizard to setup Active Directory) and then add the “Identity Management for UNIX” role service (this can be done in Server Manager).

Once that role service has been installed, then the AD schema now includes a partially RFC 2307-compliant set of UNIX attributes, such as UID, UID number, GID number, login shell, etc. (Note that it may be that these attributes are already included in the schema for Windows Server 2008; I did not check the schema before installing the Identity Management for UNIX role service. WithWindows Server 2003 R2, the schema was present at the time of installation, but the attributes were not visible until installing the UNIX identity services.)

At this point a new tab labeled “UNIX Attributes” will appear in the properties dialog box for users and groups in Active Directory. You’ll use this tab to edit the UNIX-specific attributes that are required for logins to Linux-based systems.

Create an LDAP Bind Account

You’ll also need to create an account in Active Directory that will be used to bind to Active Directory for LDAP queries. This account does not need any special privileges; in fact, making the account a member of Domain Guests andnot a member of Domain Users is perfectly fine. This helps minimize any potential security risks as a result of this account. Just be sure that you know the account’s user principal name (UPN) and password.

PREPARE ACTIVE DIRECTORY (EACH USER)

Each Active Directory account that will authenticate via Linux must be configured with a UID and other UNIX attributes. This is accomplished via the new “UNIX Attributes” tab on the properties dialog box of a user account.

After all the user accounts have been configured, then we are ready to configure Active Directory objects for each of the Linux server(s) that we’ll be integrating with AD.

PREPARE ACTIVE DIRECTORY (EACH SERVER)

Prior to using Samba to join Linux computers to Active Directory and generate a keytab automatically, we had to use the ktpass.exe utility on Windows to generate a keytab. Due to some current Samba-Windows Server 2008 interoperability issues, we can’t use Samba. That means we’ll be back to usingktpass.exe to map service principals onto accounts in Active Directory. Unfortunately, you’ll need to first disable User Account Control (UAC) on your server, since UAC interferes with ktpass.exe. (Nice, huh?)

Once you’ve disabled UAC (and rebooted your server), then you can map the service principal names (SPNs) using the following steps:

  1. Create a computer account (or a user account; either will work) with the name of the Linux server.
  2. Use the following command to map the needed SPN onto this account (backslashes indicate line continuation):
    ktpass.exe -princ HOST/server.fqdn@REALM.COM \
    -mapuser DOMAIN\AccountName$ -crypto all \
    -pass Password123 -ptype KRB5_NT_PRINCIPAL \
    -out filename.keytab
  3. Copy this file to the Linux server (using SCP or SFTP is a good option) and merge it with the existing keytab (if it exists) using ktutil. If there is no existing keytab, simply copy the file to /etc/krb5.keytab and you should be good to go.

Now that Active Directory has computer objects (and, more importantly, SPNs) for the Linux servers and the AD users have been enabled for UNIX (by populating the UNIX attributes), we’re ready to start configuring the Linux server(s) directly.

PREPARE EACH LINUX SERVER

Follow the steps below to configure the Linux server for authentication against Active Directory. (Note that this configuration was tested on a system running CentOS—a variation of Red Hat Enterprise Linux—version 4.3.)

  1. Edit the /etc/hosts file and ensure that the server’s fully-qualified domain name is listed first after its IP address.
  2. Make sure that the appropriate Kerberos libraries, OpenLDAP, pam_krb5, and nss_ldap are installed. If they are not installed, install them.
  3. Be sure that time is being properly synchronized between Active Directory and the Linux server in question. Kerberos requires time synchronization. Configure the NTP daemon if necessary.
  4. Edit the /etc/krb5.conf file to look something like this, substituting your actual host names and domain names where appropriate:
    [logging]
    default = FILE:/var/log/krb5libs.log
    kdc = FILE:/var/log/krb5kdc.log
    admin_server = FILE:/var/log/kadmind.log

    [libdefaults]
    default_realm = EXAMPLE.COM
    dns_lookup_realm = true
    dns_lookup_kdc = true

    [realms]
    EXAMPLE.COM = {
    kdc = host.example.com:88
    admin_server = host.example.com:749
    default_domain = example.com
    }

    [domain_realm]
    .example.com = EXAMPLE.COM
    example.com = EXAMPLE.COM

    [kdc]
    profile = /var/kerberos/krb5kdc/kdc.conf

    [appdefaults]
    pam = {
    debug = false
    ticket_lifetime = 36000
    renew_lifetime = 36000
    forwardable = true
    krb4_convert = false
    }
  5. Edit the /etc/ldap.conf file to look something like this, substituting the appropriate host names, domain names, account names, and distinguished names (DNs) where appropriate. (Please note that the nss_base_group line should not be broken across two lines when you edit it; it has been wrapped here for readability with the line continuation noted by a backslash)
    host 10.10.10.10
    base dc=example,dc=com
    uri ldap://server.example.com/
    binddn ldap@example.com
    bindpw adldapbindpw
    scope sub
    ssl no
    nss_base_passwd dc=example,dc=com?sub
    nss_base_shadow dc=example,dc=com?sub
    nss_base_group dc=mydomain,dc=com?sub? \
    &(objectCategory=group)(gidnumber=*)
    nss_map_objectclass posixAccount user
    nss_map_objectclass shadowAccount user
    nss_map_objectclass posixGroup group
    nss_map_attribute gecos cn
    nss_map_attribute homeDirectory unixHomeDirectory
    nss_map_attribute uniqueMember member
  6. Configure PAM (this varies according to Linux distributions) to use pam_krb5 for authentication. Many modern distributions use a stacking mechanism whereby one file can be modified and those changes will applied to all the various PAM-aware services. For example, in Red Hat-based distributions, the system-auth file is referenced by most other PAM-aware services. Here’s a properly edited /etc/pam.d/system-auth file taken from CentOS 4.4 (some lines have been wrapped for readability, as noted by a backslash; do not wrap them when editing the file):
    #%PAM-1.0
    # This file is auto-generated.
    # User changes will be destroyed the next time
    # authconfig is run.
    auth required /lib/security/pam_env.so
    auth sufficient /lib/security/pam_unix.so \
    likeauth nullok
    auth sufficient /lib/security/pam_krb5.so
    auth required /lib/security/pam_deny.so

    account sufficient /lib/security/pam_unix.so
    account sufficient /lib/security/pam_krb5.so
    account sufficient /lib/security/pam_succeed_if.so \
    uid < 100 quiet
    account required /lib/security/pam_deny.so

    password requisite /lib/security/pam_cracklib.so \
    retry=3
    password sufficient /lib/security/pam_unix.so
    nullok use_authtok md5 shadow \
    password required /lib/security/pam_deny.so

    session required /lib/security/pam_limits.so
    session required /lib/security/pam_unix.so
  7. Edit the /etc/nsswitch.conf file to include “ldap” as a lookup source for passwd, shadow, and groups.

At this point we are now ready to test our configuration and, if successful, to perform the final step: to join the Linux server to Active Directory for authentication.

TEST THE CONFIGURATION

To test the Kerberos authentication, use the kinit command, as in kinit @. This should return no errors. A klist at that point should then show that you have retrieved a TGT (ticket granting ticket) from the AD domain controller. If this fails, go back and troubleshoot the Kerberos configuration. In particular, if you are seeing references to failed TGT validation, check to make sure that both your Linux servers and AD domain controllers have reverse lookup (PTR) records in DNS and that the Linux server’s /etc/hosts file listed the FQDN of the server first instead of just the nodename.

To test the LDAP lookups, use the getent command, as in getent passwd . This should return a listing of the account information from Active Directory. If this does not work, users will not be able to login, even if Kerberos is working fine. If you run into errors or failures here, go back and double-check the LDAP configuration. One common source of errors is the name of the LDAP bind account, so be sure that is correct.

At this point, SSH logins to the Linux system using an account present in Active Directory (one which has had its UNIX attributes specified properly) should be successful. This will be true as long as you used the ktpass.exe command earlier to map the SPN onto the computer object in Active Directory. Even if youdidn’t copy the keytab over to the Linux server, logins will work. Why? Because the PAM Kerberos configuration, by default, does not require a client keytab, and does not attempt to validate the tickets granted by the TGT. This means that as long as the SPN(s) are mapped to the accounts in AD, the keytab is not necessarily required.

(Note, however, that not using a keytab and/or not requiring a keytab does leave the Linux server open to potentially spoofed Kerberos tickets from a fake KDC. In addition, “native” Kerberos authentication—i.e., using a Kerberos ticket to authenticate instead of typing in a password—won’t work without a keytab.)

DEAL WITH HOME DIRECTORIES

Unlike Windows systems, home directories are required on Linux-based systems. As a result, we must provide home directories for each AD user that will log in to a Linux-based system. We basically have three options here:

  • Manually create home directories and set ownership/permissions properly before users will be able to log in.
  • Use the pam_mkhomedir.so PAM module to automatically create local home directories “on the fly” as users log in. To do this, you would add an entry for pam_mkhomedir.so in the session portion of the PAM configuration file.
  • Use the automounter to automatically mount home directories from a network server. This process is fairly complicated (too involved to include the information here), so I’ll refer you to this article on using NFS and automounts for home directories. This has the added benefit of providing a foundation for unified home directories across both Windows and Linux systems.

Once you’ve settled on and implemented a system for dealing with home directories, you are finished! UNIX-enabled users in Active Directory can now login to Linux-based systems with their Active Directory username and password.

What’s not addressed in this article? Password management. In this configuration, users will most likely not be able to change their password from the Linux servers and have that change properly reflected in Active Directory. In addition, “native” Kerberos authentication using Kerberos tickets won’t work unless the keytab is present. In my testing, I ran into a number of issues with the keytab and TGT validation, but I’m not sure if those are errors in my process or the result of the beta status of Windows Server 2008.

I welcome your corrections, additions, or suggestions in the comments below.

Dynamic Host Configuration Protocol (DHCP) is an extremely powerful and popular mechanism by which IP addresses and other related network information are dynamically assigned to network clients when they are attached to a network. This provides significant reductions in terms of network management overheads, particularly on large networks, by avoiding the necessity to manually assign settings to each client.

This chapter is designed to provide details on how to install, configure and manage a DHCP server on a Windows Server 2008 system using the graphical DHCP console tool. For details on performing similar tasks at the command prompt refer to the next chapter, entitled Managing a Windows Server 2008 DHCP Server from the Command Line.

Contents

[hide]


Installing the DHCP Server Role

The first step in setting up a DHCP server on a Windows Server 2008 system is to install the DHCP Server feature on any servers which are required to provide the service. Before performing even this initial task, it is highly recommended that any systems designated to act as DHCP servers are assigned a static IP address. If the server is currently obtaining a dynamic IP address from another DHCP server, begin the installation process by assigning the system a static IP address. This can be achieved by launching the Server Manager and clicking View Network Connections. Right click on the network adapter on which the DHCP service is to be run and select Properties where either, or both the IPv4 or IPv6 address may be changed from automatically obtaining an IP address to specifying a static address. Once configured, exit from the properties dialog and network connections window leaving the Server Manager running.

Installation of the DHCP Server Role is performed by selecting Roles from the tree in the left hand pane of the Server Manager tool. On the Roles page, click on the Add Rolelink to launch the Add Roles Wizard. Dismiss the welcome screen if it is displayed, and in the Select Server Roles screen select the check box next to DHCP Server before clicking the Next button, read the information provided and click Next again to proceed to the Network Connection Binding screen. It is within this screen that the DHCP server is associated with specific network adapters installed in the system. Select the network adapters for which the DHCP service will be provided and click Next.

DHCP can be used not just to provide clients with an IP address, but also additional information such as the name of the parent domain (for example techotopia.com) and the IP addresses of both preferred and alternate DNS servers. If the DHCP server is required to provide these details for IPv4 clients, enter them into the Specify IPv4 DNS Server Settings page and click Next.

On the IPv4 WIN Server Settings page, enter addresses of the Preferred and Alternate WINS servers if required. Otherwise, leave the WINS is not required for applications on this network option selected and proceed to the next configuration page.

The next page allows initial DHCP scopes to be configured. A DHCP scope defines one or more ranges of IP addresses from which an IP address may assigned to a client and the duration of the IP address lease (6 days for wired clients and 8 hours for wireless clients). This may either be configured now, or at a later point in the configuration process. The topic of defining DHCP scopes is covered in the Defining DHCP Scopes section of this chapter.

With the initial DHCP IPv4 configuration steps completed, the wizard subsequently moves on to the IPv6 settings. This is where a little background information is useful. Windows Server 2008 supports two modes of IPv6 DHCP operation, known as stateless and stateful. In stateful mode, clients obtain both an IP address and other information (such as DNS addresses) through the DHCPv6 server. Instateless mode, the clients receive only the non-IP address information from the DHCPv6 server. In this case, the IP address must be provided using some other mechanism, either by configuring of static IP addresses or through the implementation of IPv6 auto-configuration.

On the Configure DHCPv6 Stateless Mode screen, select either stateful or stateless mode in accordance with your specific enterprise requirements. If stateless mode is selected the next screen will prompt for the IPv6 DNS information to be provided to clients. Enter the information and click onNext. If the DHCP is part of an Active Directory domain, the Authorize DHCP Server page will appear. Enter the credentials (either your own as shown, or alternate credentials via the Alternate Credentialsbutton) necessary to authorize the new DHCP server. Alternatively, the authorization may be performed later by skipping this step by clicking on Next.

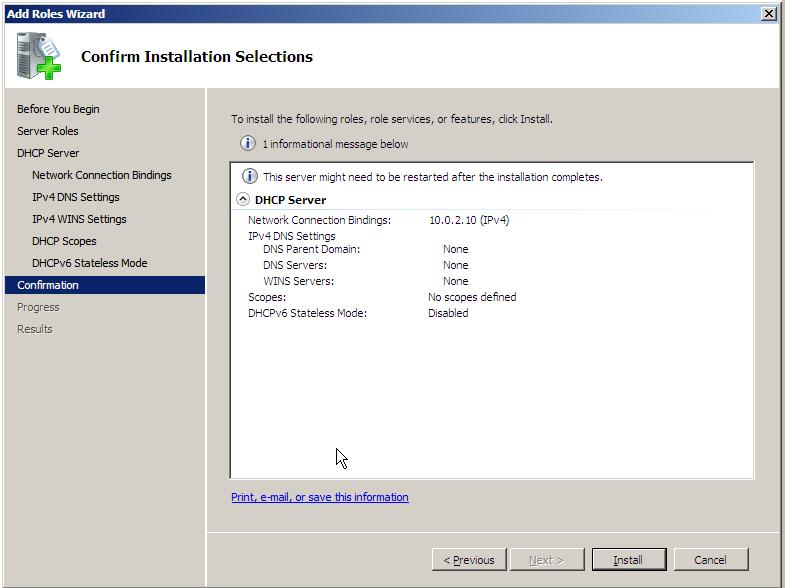
Upon completion of the DHCP server configuration the summary screen will displayed similar to the one illustrated below:


The DHCP Server Configuration Summary Screen


Assuming that the summarized configuration is correct, click on Install to complete the installation process. The wizard will display the progress of the DHCP Server Role installation before displaying a results screen confirming the successful installation. Once installation is complete, the DHCP Server may be managed locally or remotely using the DHCP console (Start -> All Programs -> Administrative Tools -> DHCP).

Authorizing DHCP Servers in Active Directory

If a DHCP server is to operate within an Active Directory domain (and is not running on a domain controller) it must first be authorized. This can be achieved either as part of the DHCP Server role installation, or subsequently using either DHCP console or at the command prompt using the netshtool.

If the DHCP server was not authorized during installation, invoke the DHCP console (Start -> All Programs -> Administrative Tools -> DHCP), right click on the DHCP to be authorized and selectAuthorize. To achieve the same result from the command prompt, enter the following command:

netsh dhcp server serverID initiate auth

In the above command syntax, serverID is replaced by the IP address or full UNC name of system on which the DHCP server is installed.

Understanding DHCP Scope Types

DHCP scopes are used to define ranges of addresses from which a DHCP server can assign IP addresses to clients. Scopes fall into Normal, Multicast and Superscope categories as follows:

Normal Scope - Allows A, B and C Class IP address ranges to be specified including subnet masks, exclusions and reservations. Each normal scope defined must exist within its own subnet.

Multicast Scope - Used to assign IP address ranges for Class D networks. Multicast scopes do not have subnet masks, reservation or other TCP/IP options. Multicast scope address ranges require that a Time To Live (TTL) value be specified (essentially the number of routers a packet can pass through on the way to its destination).

Superscope - Essentially a collection of scopes grouped together such that they can be enabled and disabled as a single entity.

Configuring IPv4 Scopes Using the DHCP Console

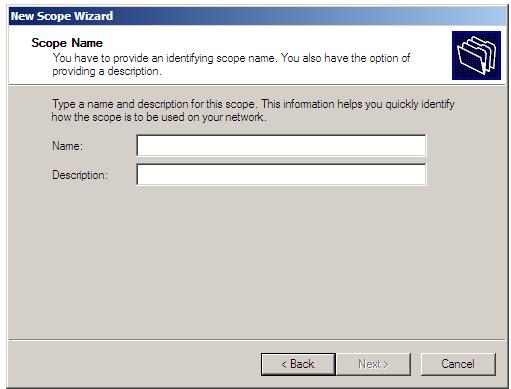
New scopes on Windows Server 2008 can either be configured from the graphical DHCP console, or from the command prompt using the netshutility. To create a new scope in the DHCP console (launched from Start -> All Programs -> Administrative Tools -> DHCP) click on the server name in left hand panel so that IPv4 and IPv6 categories are listed in the main panel. Right click on the required IP version and select New scopefrom the menu top invoke the New Scope Wizard. Click on Next to skip the welcome screen so that the Scope Name dialog is displayed:


DHCP Scope Name configuration screen


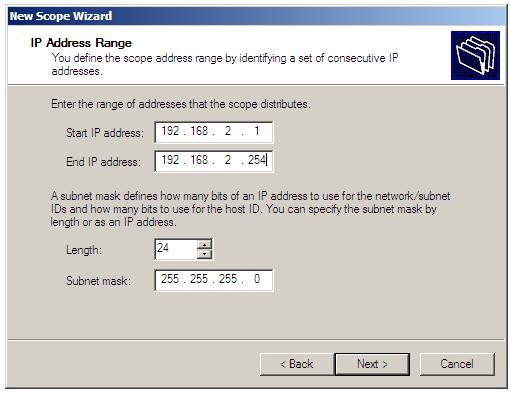
Enter a suitable name and description for the scope and press Next to proceed to the IP Address Range screen. In this screen, enter the start and end addresses of the IP address scope followed by the subnet mask, either in terms of bit length or in IP format (for example 255.255.255.0 or 24 bits). Note that when the start and end addresses are entered the subnet mask fields are filled in automatically, but may be changed manually if required:


DHCP Scope IP address range


If the address range specified encompasses multiple subnets (for example 192.168.2.1 through to 192.168.3.254) the wizard will warn that the designated range is too large for a single scope and provide the option to create a superscope made up of a number of different scopes depending on how many subnets are contained within the range.

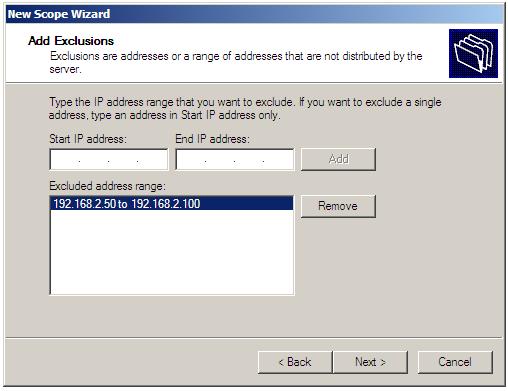
Assuming that all addresses in the scope range are on the same subnet, the wizard will provide the option to specify exclusions within the scope. Exclusions are essentially ranges of one or more IP addresses within the defined scope which are not available for assignment to clients. Multiple exclusion ranges may be defined within a single scope by using the Add button to add new ranges:


Define exclusion ranges for a DHCP scope


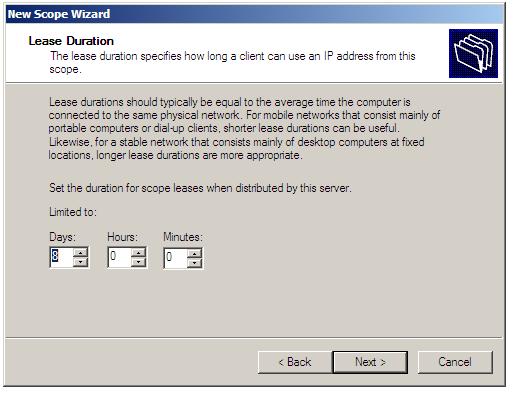
The next screen of the New DHCP Scope wizard relates to the topic of Lease Duration for the IP addresses in the current scope. Lease duration refers to the amount of time an IP address is assigned to a particular client computer or device. If the subnet on which the DHCP server operates has a high turnover of clients then a short lease is recommended (since the server will end up holding IP addresses for clients which are no longer connected, potentially exhausting the pool of IP addresses). For subnets where the connected clients are fairly stable, longer leases might be more appropriate. To define a lease duration use the spin boxes provided, specifying the duration in units of days, hours and even minutes (the default is 8 days):


Specifying DHCP lease duration


The next screen provides the option to configure DHCP options (such as default gateway, DNS and WINS servers) which will be provided to clients along with the dynamic IP address. If the yes option is selected, the wizard will present a series of screens where these options may be specified if required. On each screen enter the appropriate information, or leave the page blank if the option is required (for example not all configurations require a WINS server). If "no" is selected the wizard will skip to the Activate Scope screen where, as the name suggests, the new scope may be activated. Once activated the wizard may be closed. The new scope is now defined and active.

Configuring DHCP Reservations

DHCP reservations provide a mechanism by which IP addresses may be permanently assigned to a specific client based on the MAC address of that client.

The MAC address of a Windows client can be found running the ipconfig /all command. For Linux systems the corresponding command is ifconfig -a. Once the MAC address has been identified, the reservation may be configured using either the DHCP console or at the command prompt using thenetsh tool. One important point to note is that ifconfig displays the MAC address delimited by colons (:), for example 06:EC:E6:11:47:BD. When entering the MAC address into the New Reservations dialog on Windows the colons will need to be replaced with dashes (-), for example 06-EC-E6-11-47-BD. Failure to do this will result in a warning dialog stating that the Unique identifier you have entered may not be correct.

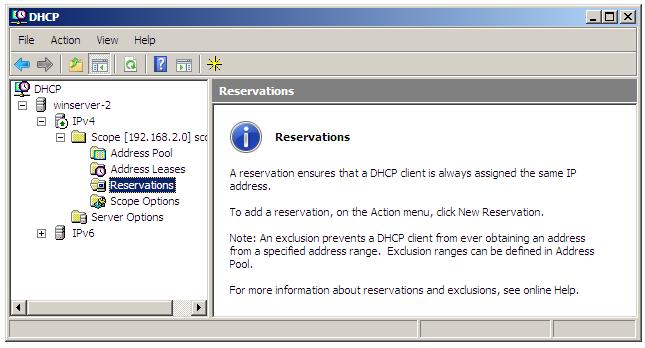
To configure reservation using the DHCP console, select Start -> All Programs -> Administration Tools -> DHCP and select the DHCP server and unfold the appropriate scope from the tree in the left panel. Within the scope sub-list, select Reservations as illustrated below:


Preparing to add a new reservation to a DHCP scope


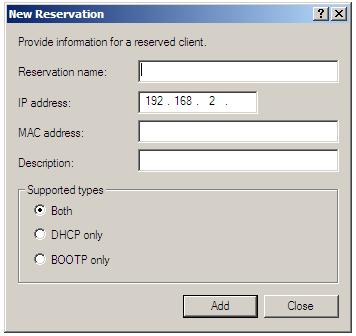
Right click on Reservations and choose New Reservation... from the menu to launch the New Reservation dialog:


Adding a new reservation to a DHCP scope


Begin by entering a name for the reservation followed by the IP address from the currently selected scope which is to be reserved for the client together with the MAC address of the client (or more specifically the network adapter of the client). Finally specify whether the reservation is to be made for BOOTP or DHCP clients, or both. Once the information has been entered click the Add button. When all reservations have been entered click Cancel to close the dialog.

To add a reservation using netsh the following syntax is used:

netsh dhcp server \\servername scope subnetID add reservedip IPaddress MacAddress ReservationName Comment

For example the following command reserves an IP address for a specific MAC address (note that the MAC address must be entered without any delimiters):

C:\Users\Administrator>netsh dhcp server \\winserver-2 scope 192.168.2.0 add reservedip  192.168.2.12 0013720B1457 "CEO Printer" "Printer in Exec Suite"  Changed the current scope context to 192.168.2.0 scope.  Command completed successfully. 

To list the current reserved IP addresses for a particular scope the following netsh command may be used:

C:\Users\Administrator>netsh dhcp server \\winserver-2 scope 192.168.2.0 show reservedip  Changed the current scope context to 192.168.2.0 scope.  ===============================================================   Reservation Address -    Unique ID ===============================================================      192.168.2.10      -    00-0b-db-18-a0-db-     192.168.2.11      -    06-ec-e6-11-47-bd-     192.168.2.12      -    00-13-72-0b-14-57-   No of ReservedIPs : 3 in the Scope : 192.168.2.0.  Command completed successfully. 


P

How to Install Read-Only Domain Controller in Windows Server 2008 Core

copied from: http://www.trainsignal.com/blog/server-2008-install-rodc-read-only-domain-controlle

Installing a Read-Only Domain Controller (RODC) isn’t much different than installing a regular domain controller.

However, there is one important factor to keep in mind. A RODC can only be installed into an existing Active Directory Domain with at least one full (non-read-only) Windows 2008 Server Domain Controller.

The reason is that the RODC is a new feature to Windows 2008 and it needs at least one DC to understand what it is doing in order to function properly.

Once the decision has been made to install a RODC the next decision is whether to install on a full-install or core-install of Windows 2008 Server.

The RODC is primarily aimed at providing additional security on an Active Directory Database for a server that is not physically secured. Installing a RODC on a Core Install of Windows 2008 provides no additional physical security.

It is actually a fair assumption that if someone is savvy enough to break into a stolen server that they also are capable of working most of their tricks from the command-line. So, while a Core Installation does increase security by having a smaller attack footprint, this level of security is separate from that provided by a RODC.

Although, it can be tempting to consider a Core Installation for remote RODC installs to lower the amount of patches and updates that need to be installed. However, it is important to remember that if there is no technical staff on-site, it can be much more difficult to walk someone through any procedures that must be performed locally if the non-technical person has to use the command line.

Installing RODC on a Core Server Install

There is only one way to install RODC role on a Core Server installation. The dcpromo.exe command runs on the GUI-less version of Windows Server 2008.

Using an answer file for the command makes the process much easier than trying to get all the switches just right in the command line.

Installing the Read-Only Domain Controller on Windows Server 2008 - 1

Although there are many settings available depending upon your particular infrastructure, just basic information is required to complete the command:

  • an account with permissions to do what you are trying to do
  • the name of the Site
  • the database and log paths
  • and whether or not to install DNS.

Installing the Read-Only Domain Controller on Windows Server 2008 - 2

Many people will put a “yes” for RebootOnCompletion. If you are doing an actual unattended promotion then that would make sense.

If you are sitting at the console, I prefer to manually reboot the server so that I can take as much time as I want to study what is on the screen if there is an issue.

Regular Installation

On a full install of Windows Servers 2008, there is of course a GUI tool to help with the process. The Active Directory Domain Services Installation Wizard handles the installation of RODC.

Type “dcpromo” at a command prompt to start the wizard. The first screen will ask you whether you want to use an existing forest, or create a new domain in a new forest. Since you must join an existing domain with a RODC, the choice is obvious.

Next you’ll be asked for a username and password. The account must be a member of Domain Admins in order to create a Read-Only Domain Controller.

Next, you’ll choose the site you wish to join.

So far, this is all the same as a regular Domain Controller install. Under “Additional Options” is where you actually choose to make this a Read-Only Domain Controller installation.

Installing the Read-Only Domain Controller on Windows Server 2008 - 3

Next, choose the paths for installing the components, or just click Next to use the defaults. Once the confirmation screen appears, you are all set.

In this case, you might as well check “Reboot On Completion”. Unlike in the command-line environment, here in the GUI-world if something goes wrong you’ll have all the time you want before clicking on OK or Next to analyze what happened.

Tuesday, March 27, 2012

How to Install Read-Only Domain Controller in Windows Server 2008?

Read-only Domain Controller (RODC) is Windows Server 2008 feature that deploys locked version of Active Directory Domain Controller database. RODC is suitable for small branch offices and remote work locations where physical security is not established. You can install RODC on a Server Core to reduce disk resource and increase server security.

Installing Read-Only Domain Controller (RODC)


To Install RODC, perform these steps;

1. In stall and setup Server 2008 on primary domain controller.

2. Install Server 2008 on that would act as RODC.

3. Click Start -> Administrative Tools -> Server Manager on the RODC. You must login with administration credentials.

4. Scroll down and click on Add Roles.

5. Click next on the “Before You Begin” console.

6. Select Active Directory Domain Services and click next.

7. Click next to install Active Directory.

8. Click Install on the “Confirm Installation Selection” console.

9. Click close when the installation completes.

10. In the Server Manger, expand and click on Active Directory Services.

11. In the summary console, click on the “Run the Active Directory Domain Services Installation Wizard”. Active Directory Domain Services Installation Wizard opens up.

12. Put a check mark on the “Use advanced mode installation” option in the welcome screen. Click next.

13. Click next on the Operating System Compatibility console.

14. Choose existing forest in the Deployment Configuration console.

15. Choose Add a Domain Controller to an Existing Domain in the deployment configuration console.
16. Type the domain name and click next and also click next to the select domain console.
(Note: set network credential using administrator login details registered in the Main Domain Controller)

17. Select a Site or leave it as default if you do not have sites configured and click next.

18. Put a check mark on the “Read-only domain controller” and DNS options.

19. In the “Specify the password replication policy” console, add groups and users to login to the RODC with allow permission. Remove any unnecessary groups or users and click next.

20. In the “Delegation of RODC installation and Administration” console, type the local administrator or administration group to delegate the RODC administration.

21. Leave “Replicate data over the network from an existing domain controller” and click next.

22. Choose the domain controller to replicate data from and click next.

23. Review the default Database, Sysvol, and Log files locations and click next.

24. In the “Directory Services Restore Mode Administrator Password” console, type the Active Directory Restore Mode password and click next.

25. Review the RODC installation and click next.

26. Restart the computer once prompted to do so