Cara Mudah Untuk... Membuang Virus/Malware Smart HDD
Semasa memuatturun dokumen dari multiply
akibat penutupan servisnya, laptop saya tiba-tiba berkelakuan ganjil. Muncul Tingkap Dialog Amaran mengatakan ada masalah dengan
Hard Disk. Cuak juga rasanya. Laptop ini baru lima bulan dibeli. Takkanlah kualiti perkakasannya seteruk ini. Kemudiannya, Pak Cik Google memberithu ia adalah Smart HDD. Lega, at least I know that laptop is physically OK.
Virus ini menukarkan atribut bagi setiap fail direktori kepada
hidden hingga akhirnya saya tak dapat lagi melihat nama-namanya di dalam Tingkap Windows Explorer. Lebih buruk lagi ia memadam kandungan Start Button. Lalu kosong dan tak dapat hendak mencapai apa-apa perisian ataupun fail.
Saya tahu fail/direktori sebenarnya tidak hilang tetapi cuma tersorok sahaja. Maka saya gunakan Perisian
Portable 7Zip untuk meninjau fail/direktori ini (Saya hidupkan Windows melalui Safe Mode). Melalui tinjaun ini, semuanya didapati masih wujud. Dengan menggunakan 7Zip saya tukarkan buang atribut
hidden. Tapi simptom tidak akan selesai hinggalah Smart HDD dibuang sepenuhnya.
Saya dapati
http://malwaretips.com/blogs/smart-hdd-removal-steps/ menyediakan panduan yang agak menyeluruh juga. Walaubagaimanapun, saya malas nak
spend masa buat kerja-kerja ini. Saya pindahkan semua fail/direktori penting keluar, dan saya gunakan
Recovery Software laptop saya untuk kembalikan laptop ke status asal ketika keluar dari kilang (Ini lagi mudah, tinggalkan aje buat sejam dua dan pergi diner dulu, balik nanti laptop dah ready :-P).
----------
Smart HDD Uninstall Instructions
APRIL 12, 2012 By
STELIAN PILICI
Smart HDD is a malicious software that will display fake alerts, claiming that several hard drive errors were detected on your computer.The alerts are professional looking pop-ups and when you click on them, you’re advised to buy Smart HDD in order to fix this errors.
In reality, none of the reported issues are real, and are only used to scare you into buying Smart HDD and stealing your personal financial information.
If you’ve got a Smart HDD infection , you’ll be seeing this screens :
Smart HDD will generate the following error messages:
Hard drive boot sector reading error
During I/O system initialization, the boot device driver might have failed to initialize the boot device. File system initialization might have failed because it did not recognize the data on the boot device.
System blocks were not found
This has most likely occurred because of hard disk failure.
This may also lead to a potential loss of data.
Error 0×00000024 – NTFS_FILE_SYSTEM
The Stop 0×24 message indicates that a problems occurred within Ntfs.sys, the driver file that allows the system to read and write to NTFS file system drives. It is most often related to hard drive errors.
Error 0×00000078 – INACCESSIBLE_BOOT_DEVICE
The Stop 0×78 message indicates that Windows has lost access to the system partition or boot volume during the startup process. During I/O system initialization, the boot device driver might have failed to initialize the boot device (typically a hard disk). Repartitioning the system partition or installing a new SATA/RAID adapter or disk controller might also induce this error.
The DRM attribute value is too small before disk scan
Drive Reliability Monitor (a system or monitoring the reliability of disc drive functioning). The malfunction counter built into the disk drive shows excessive number of malfunctions. The storage device needs to be replaced.
Error 0×00000050 – PAGE_FAULT_IN_NONPAGED_AREA
The Stop 0×50 message indicates that requested data was not in memory. The system generates an exception error when using a reference to an invalid system memory address.
Error 0x0000002E – DATA_BUS_ERROR
The Stop 0x2E message is typically caused by failed or defective RAM (including motherboard, Level 2 cache, or video memory), incompatible or mismatched memory hardware, or when a device driver attempts to access an address in the 0x8xxxxxxx range that does not exist (does not map to a physical address).
Registration codes for Smart HDD
As an optional step,you can use the following license key to register Smart HDD and stop the fake alerts.
15801587234612645205224631045976
Please keep in mind that entering the above registration code will NOT remove Smart HDD from your computer , instead it will just stop the fake alerts so that you’ll be able to complete our removal guide more easily.
We strongly advise you to follow our Smart HDD removal guide and ignore any alerts that this malicious software might generate.Under no circumstance should you buy this rogue security software as this could lead to identity theft.
Removal guide for Smart HDD
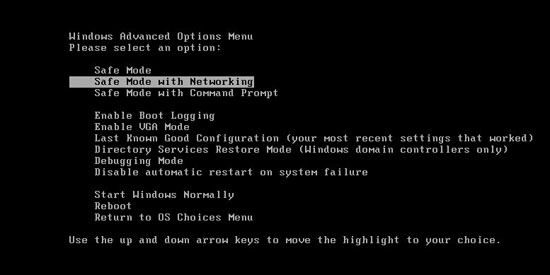
STEP 1 : Start your computer in Safe Mode with Networking
- Remove all floppy disks, CDs, and DVDs from your computer, and then restart your computer.
- Press and hold the F8 key as your computer restarts.Please keep in mind that you need to press the F8 key before the Windows start-up logo appears.
- On the Advanced Boot Options screen, use the arrow keys to highlight Safe Mode with Networking , and then press ENTER.
![[Image: Safemode.jpg]](http://malwaretips.com/images/removalguide/safemode.jpg "Safe Mode with Networking screen")
- Log on to your computer with a user account that has administrator rights
STEP 2: Remove Smart HDD malicious proxy server
Smart HDD may add a proxy server which prevents the user from accessing the internet,follow the below instructions to remove the proxy.
- Start Internet Explorer
![[Image: Smart HDD- IE]](http://malwaretips.com/images/removalguide/Ieicon.png "IE 9") and if you are using Internet Explorer 9 ,click on the gear icon
and if you are using Internet Explorer 9 ,click on the gear icon ![[Image: IE gear icon]](http://malwaretips.com/images/removalguide/icongear.jpg "Gear Icon") (Tools for Internet Explorer 8 users) ,then select Internet Options.
(Tools for Internet Explorer 8 users) ,then select Internet Options.
![[Image: Internet-options-IE.png]](http://malwaretips.com/images/removalguide/ie1.png "Internet Options in IE")
- Go to the tab Connections.At the bottom, click on LAN settings.
![[Image: Remove-proxy-server2.png]](http://malwaretips.com/images/removalguide/ie2.png "Connections tab in Internet Explorer")
- Uncheck the option Use a proxy server for your LAN. This should remove the malicious proxy server and allow you to use the internet again.
![[Image: Remove-proxy-server3.png]](http://malwaretips.com/images/removalguide/ie3.png "Uncheck the option Use a proxy server for your LAN")
If you are a Firefox users, go to Firefox(upper left corner) → Options → Advanced tab → Network → Settings → Select No Proxy
STEP 3: Run RKill to terminate known malware processes associated with Smart HDD.
RKill is a program that attempts to terminate any malicious processes associated with Smart HDD ,so that your normal security software can then run and clean your computer of infections.
As RKill only terminates a program’s running process, and does not delete any files, after running it you should not reboot your computer as any malware processes that are configured to start automatically will just be started again.
- While your computer is in Safe Mode with Networking ,please download the latest official version of RKill.
- Double-click on the RKill iconin order to automatically attempt to stop any processes associated with Smart HDD.
![[Image: run-rkill-1.png]](http://malwaretips.com/images/removalguide/rkill1.png "RKILL ICON")
- RKill will now start working in the background, please be patient while the program looks for various malware programs and tries to terminate them.
![[Image: run-rkill-2.png]](http://malwaretips.com/images/removalguide/rkill2.png "RKILL Command prompt")
IF you receive a message that RKill is an infection, that is a fake warning given by the rogue. As a possible solution we advise you to leave the warning on the screen and then try to run RKill again.Run RKill until the fake program is not visible but not more than ten times.
IF you continue having problems running RKill, you can download the other renamed versions of RKill from here.
- When Rkill has completed its task, it will generate a log. You can thenproceed with the rest of the guide.
![[Image: Smart HDD rkill3.jpg]](http://malwaretips.com/images/removalguide/rkill3.png "RKILL LOG")
WARNING: Do not reboot your computer after running RKill as the malware process will start again , preventing you from properly performing the next step.
- Please download the latest official version of Malwarebytes Anti-Malware FREE.
- Install Malwarebytes’ Anti-Malware by double clicking on mbam-setup.
![[Image: malwarebytes-installer.png]](http://malwaretips.com/images/removalguide/mbam1.png "Malwarebytes Anti-Malware Installer")
- When the installation begins, keep following the prompts in order to continue with the installation process. Do not make any changes to default settings and when the program has finished installing, make sure you leave both the Update Malwarebytes’ Anti-Malware and Launch Malwarebytes’ Anti-Malware checked. Then click on the Finishbutton. If Malwarebytes’ prompts you to reboot, please do not do so.
![[Image: install-malwarebytes.png]](http://malwaretips.com/images/removalguide/mbam2.png "Install Malwarebytes Anti-Malware")
- Malwarebytes Anti-Malware will now start and you’ll be prompted to start a trial period , please select ‘Decline‘ as we just want to use the on-demand scanner.
![[Image: decline-trial-malwarebytes.png]](http://malwaretips.com/images/removalguide/mbam3.PNG "Decline trial period in Malwarebytes Anti-Malware")
- On the Scanner tab,please select Perform full scan and then click on theScan button to start scanning your computer for any possible infections.
![[Image: malwarebytes-full-system-scan.png]](http://malwaretips.com/images/removalguide/mbam4.png "Perform a Full System Scan")
- Malwarebytes’ Anti-Malware will now start scanning your computer for Smart HDD malicious files as shown below.
![[Image: malwarebytes-scanning.png]](http://malwaretips.com/images/removalguide/mbam5.png "Malwarebytes Anti-Malware scanning for Smart HDD")
- When the scan is finished a message box will appear, click OK to continue.
![[Image: malwarebytes-scan-finish.png]](http://malwaretips.com/images/removalguide/mbam9.png "Malwarebytes when the scan is finished")
- You will now be presented with a screen showing you the malware infections that Malwarebytes’ Anti-Malware has detected.Please note that the infections found may be different than what is shown in the image.Make sure that everything is Checked (ticked) and click on the Remove Selected button.
![[Image: malwarebytes-scan-results.png]](http://malwaretips.com/images/removalguide/mbam6.png "Smart HDD infection scan results")
- Malwarebytes’ Anti-Malware will now start removing the malicious files.If during the removal process Malwarebytes will display a message stating that it needs to reboot, please allow this request.
![[Image: malwarebytes-reboot-prompt.png]](http://malwaretips.com/images/removalguide/mbam10.png "Reboot prompt from Malwarebytes")
STEP 5: Double check your system for any left over infections with HitmanPro
- This step can be performed in Normal Mode ,so please download the latest official version of HitmanPro.
- Double click on the previously downloaded file to start the HitmanPro installation.
![[Image: hitmanpro-icon.png]](http://malwaretips.com/images/removalguide/hpro1.png "HitmanPro Installer")
NOTE : If you have problems starting HitmanPro, use the “Force Breach” mode. Hold down the left CTRL-key when you start HitmanPro and all non-essential processes are terminated, including the malware process. (How to start HitmanPro in Force Breach mode – Video)
- Click on Next to install HitmanPro on your system.
![[Image: installing-hitmanpro.png]](http://malwaretips.com/images/removalguide/hpro2.png "HitmanPro installation process")
- The setup screen is displayed, from which you can decide whether you wish to install HitmanPro on your machine or just perform a one-time scan, select a option then click on Next to start a system scan.
![[Image: hitmanpro-setup-options.png]](http://malwaretips.com/images/removalguide/hpro3.png "HitmanPro setup options")
- HitmanPro will start scanning your system for malicious files. Depending on the the size of your hard drive, and the performance of your computer, this step will take several minutes.
![[Image: hitmanpro-scanning.png]](http://malwaretips.com/images/removalguide/hpro4.png "HitmanPro scanning for Smart HDD")
- Once the scan is complete,a screen displaying all the malicious files that the program found will be shown as seen in the image below.After reviewing each malicious object click Next.
![[Image: hitmanpro-scan-results.png]](http://malwaretips.com/blogs/wp-content/uploads/2012/02/rsz_hpro5.png "HitmanPro Smart HDD scan results")
- Click Activate free license to start the free 30 days trial and remove the malicious files.
![[Image: hitmanpro-activation.png]](http://malwaretips.com/images/removalguide/hpro6.png "Activate HitmanPro free license to remove detected infections")
- HitmanPro will now start removing the infected objects, and in some instances, may suggest a reboot in order to completely remove the malware from your system. In this scenario, always confirm the reboot action to be on the safe side.
STEP 6: Unhide your files and folders
Smart HDD modifies your file system in such a way that all files and folders become hidden, to restore the default settings , you’ll need to run the below program.
- Please download Tweaking.com-UnhideNonSystemFiles.exe to unhide your files and folders.
- Double click on Tweaking.com-UnhideNonSystemFiles.exe and when the utility starts click on the ‘Start’ button to unhide your files.
![[Image: unhide-icon.png]](http://malwaretips.com/blogs/wp-content/uploads/2012/04/unhide-files.png "Click on the Start button to unhide your files")
STEP 7 : Restore your shortcuts and remove any left over malicious registry keys
Smart HDD has moved your shortcuts files in the Temporary Internet folder and added some malicious registry keys to your Windows installation , to restore your files we will need to perform a scan with RogueKiller.
- Please download the latest official version of RogueKiller.
- Double click on RogueKiller.exe to start this utility and then wait for the Prescan to complete.This should take only a few seconds and then you canclick the Start button to perform a system scan.
![[Image: roguekiller-1.png]](http://malwaretips.com/blogs/wp-content/uploads/2012/04/roguek-1.png "Click on the Start button to perform a system scan")
- After the scan has completed, press the Delete button to remove any malicious registry keys.
![[Image: roguekiller-2.png]](http://malwaretips.com/blogs/wp-content/uploads/2012/04/roguek-2.png "Press Delete to remove the malicious registry keys")
- Next we will need to restore your shortcuts, so click on the ShortcutsFix button and allow the program to run.
![[Image: roguekiller-1.png]](http://malwaretips.com/blogs/wp-content/uploads/2012/04/roguek-3.png "Click on the Start button to perform a system scan")
STEP 8: Get your desktop look back!
Smart HDD changes your desktop background to a solid black color,to change it back to default one follow the below instruction.
- Windows XP : Click on the Start button and then select Control Panel. When the Control Panel opens, please click on the Display icon. From this screen you can now change your Theme and desktop background.
- Windows 7 and Vista : Click on the Start button and then select Control Panel. When the Control Panel opens, please click on the Appearance and Personalization category. Then select Change the Theme or Change Desktop Background to revert back to your original Theme and colors.
STEP 9: Restore your pinned task bar shortcuts , star menu items and other missing icons.
Smart HDD has moved your saved pinned task bar items and other shortcuts into the temporary internet folder, so now we will have to copy them back to their original location.
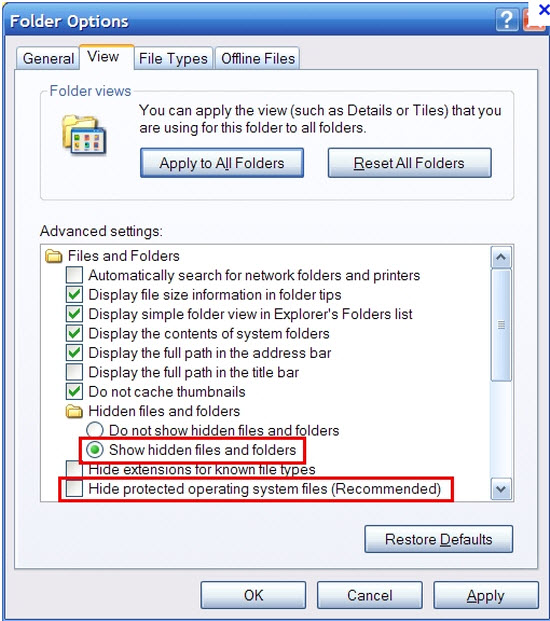
1. Enable on your system the ‘Show hidden files, folders, and drives’ option.
- If you are using Windows 7 or Vista,go to Computer → Click on theOrganize tab → select Folder and search options.
- If you are using Windows XP,go to My Computer → Tools tab → selectFolder Options.
![[Image: viewhiddenfiles.png]](http://malwaretips.com/images/removalguide/view-hidden-items.png "Enable the option to see hidden files")
In the new window that appeared select the
View tab and choose the option
Show hidden files, folders, and drives then click Apply and OK.
![[Image: Show hidden files, folders, and drives.png]](http://malwaretips.com/images/removalguide/see-hidden-files.png "Show hidden files, folders, and drives")
2.This rogue software has moved your shorcuts in a folder in the Temporary Internet files called smtmp, so now we will need to copy them back to their original locations.
- Windows 7 and Vista users can find the smtmp folder in C:\Users\[Your Username]\AppData\Local\Temp
- Windows XP users can find smtmp folder the in : C:\DOCUMENTS AND SETTINGS\[Your Username]\LOCAL SETTINGS\Temp
The smtmp folder will contain 4 folders and you’ll need to copy the content of this folders back to their original locations.
- Copy the content from %Temp%\smtmp\1\ to:
Windows XP: C:\Documents and Settings\All Users\Start Menu
Windows Vista and Windows 7: C:\ProgramData\Microsoft\Windows\Start Menu
- Copy the content from %Temp%\smtmp\2\ to:
Windows XP: C:\Documents and Settings\[your username]\Application Data\Microsoft\Internet Explorer\Quick Launch\
Windows Vista and Windows 7: C:\Users\[your username]\AppData\Roaming\Microsoft\Internet Explorer\Quick Launch\
- Copy the content from %Temp%\smtmp\3\ to:
Windows XP: It does not exist on Windows XP.
Windows Vista and Windows 7 C:\Users\[your username]\AppData\Roaming\Microsoft\Internet Explorer\Quick Launch\User Pinned\TaskBar
- Copy the content from %Temp%\smtmp\4\ to:
Windows XP : C:\Documents and Settings\All Users\Desktop
Windows Vista and Windows 7: C:\Users\Public\Desktop
If you are still experiencing problems while trying to remove Smart HDD from your machine, please start a new thread in our Malware Removal Assistance forum.




![[Image: Smart-HDD.png]](http://malwaretips.com/images/fakeav/Smart-HDD.png "Smart HDD")
![[Image: Show hidden files, folders, and drives.png]](http://malwaretips.com/images/removalguide/path-to-hidden-files.png "Copy the content of each folder to their original location")

