Auto-generate Flow Chart from Java/C++ Codes:

Raptor Flowchart Tutorial For Beginners

Sunday, April 29, 2012

Android


  1. Android adalah sistem operasi berasaskan Linux untuk peranti mudah alih seperti telefon pintar dan komputer buku.
  2. Ia dibangunkan oleh Perikatan Telefon bimbit Terbuka, yang diketuai oleh Google, dan syarikat-syarikat lain.
    • Pada tahun 2005, Google membeli syarikat pemilik asal Android iaitu Android Inc. Google melepaskan kod Android sebagai sumber terbuka pada tahun 2007 di bawah Apache License. Seterusnya Google mewujudkan sebuah konsortium yang terdiri daripada 86 syarikat perkakasan, perisian, dan telekomunikasi yang memberi tumpuan untuk membangunkan piawai terbuka bagi peranti bimbit.
  3. Kini, peranan penyelenggaraan dan pembangunan Android dipikul oleh Android Open Source Project (AOSP).
  4. Android mempunyai sebuah komuniti pembangun perisian ("apps") yang besar. Komuniti ini telah membantu meningkatkan populariti penggunaan Android.
  5. Apps boleh dimuat turun dari laman Google Play atau pihak ketiga.
  6. Pembangun perisian menggunakan Bahasa Aturcara Java untuk 

Saturday, April 28, 2012

Strive For Success


I am a Muslim. I read Quran. As a Muslim, I believe Quran is a word of ALLAH, The Only God.

Quran emphasizes on success in life. The Verse.5 of the Chapter.2 of Quran says:
"Those are upon [right] guidance from their Lord, and it is those who are the successful." (2:5)

Quran tells me that those who are successful in life are actually those who are rightly guided by ALLAH. To seek guidance from ALLAH, Muslim pray five times a day and recite Al-Fatihah in their prayer, asking ALLAH to guide them. The Al-Fatihah says:
"It is You we worship and You we ask for help." (1:5)
"Guide us to the straight path". (1:6)

As prayers is essential to the life of a Muslim, the call to prayers (Azaan) always remind Muslims of their duty. The Line.5 of Azaan says:
"Hayya 'ala 'l-falah" or "Hasten to success". (http://en.wikipedia.org/wiki/Adhan)

Prayer (Solat) involves physical and spiritual focus. The body and mind must focus towards ALLAH throughout the solat. This could be difficult to most of the people as the mind sometimes deviate to other things while the body performs the solat. Nevertheless, this is the ultimate quality of solat. The Verse.1 and 2 of the Chapter.23 says:
"Certainly will the believers have succeeded." (23:1)
"They who are during their prayer humbly submissive." (23:2)


Simple Way To Get Android 2.0 Virtual Appliance


Cara mudah untuk mendapatkan Android 2.0 Virtual Appliance


Description

Android Virtual Appliance is a VM based on Ubuntu 8.04 LTS. It has latest version of eclipse, Android 2.0 SDK and Java 1.6. This appliance is a perfect start for anyone looking to start mobile software for Google's android. 100% free to download and use


Friday, April 27, 2012

Simple Way To Create Android 4 Virtual Machine for VMWare


Cara mudah mencipta Mesin Maya Android 4 bagi VMWare.


  1. Download and install VMware Player. This is VMware’s entry-level free virtualization product for end users.
  2. Instead of downloading a file from the Android x86 project, I grabbed a customized one with better support for VMWare drivers from Dan Fages. Download the android-x86-vm-20120130.iso.gz file and extract it somewhere on your computer.
  3. Create a New Virtual Machine. Set the “Installer disc image file” to the Android x86 ISO file you just downloaded:


ANDROID - Multiple Activities


In Android, an activity is represent a single screen. Most applications have multiple activities to represent different screens, for example, one activity to display a list of the application settings, another activity to display the application status.

Follow tutorial: https://docs.google.com/document/d/1Plv6E2jDnmiLcKHagdEa1LEK6oRSdR618mSthYkYybw/edit

Thursday, April 26, 2012

ANDROID - Publishing APK Using Basic4Android


1) This is an example of a self-published APK.
Goto http://sites.google.com/site/notarazi/home/android, look for file name test4.apk, download using your android machine and install it.


Click here for Show Country tutorial https://docs.google.com/document/d/1GuALSwc672ASJAAxV10wQvUUCNr4gv7uAarOTO4eiZw/edit


2) This is a guide for marketing APK: http://www.basic4ppc.com/android/wiki/index.php/Marketing_Your_App

Simple Way To Get Android Virtual Machine for VirtualBox


Cara mudah untuk mendapatkan Mesin Maya Android Bagi VirtualBox

Installing the SDK for google’s Android platform can be a rather cumbersome process. To save you some time, I have created a Virtualbox Virtual Machine with Eclipse and Android SDK 1.5 r2 preinstalled.

Kandungan Penuh: http://hartvig.de/2009/virtualbox-virtual-machine-with-eclipse-and-android-sdk-15-r2-preinstalled/

Wednesday, April 25, 2012

ANDROID - Visual Basic


Eclipse provides a useful environment for building Android Program. However, it is based on Java programming style and those who are already used to Visual Basic style of programming may not be convenient with it. The alternative to Eclipse and Java is Basic4Android. Basic4Android is developed by a company based in Israel. It provides a VB-style environment and in fact is much easier to use as compared to Java/Eclipse.

Download the package here:
https://sites.google.com/site/notarazi/home/android/Basic4AndroidDev.zip?attredirects=0&d=1


ANDROID - Form Actions


1. We start with the original codes:
https://docs.google.com/document/d/1tRqITedqbKxgJXPZCAM1wc2RWZKURpkyiGCHJHmY4n0/edit

2. Modify the form so that it checks for the username "Y" only.
https://docs.google.com/document/d/1GBDNscOgZQ30XJR6kOvvImKRZuz6SEOfGLCEXHLbBo0/edit

3. Get the full source code for connecting Android Form to MySQL via PHP codes.
https://docs.google.com/document/d/1XZ8w12VkA-Jpi7ymO-8SVc2P5PPDZjzJU25tuVx0_xs/edit

The following exercise demonstrate a basic connection between Android Form and MySQL via PHP interface.

a. Prepare a MySQL Database table, in this example,
     Database: razohcom_androidtest
     Username: razohcom_droid
     Password: droid1234

https://sites.google.com/site/notarazi/home/android/razohcom_androidtest.sql?attredirects=0&d=1

b. Prepare a Front-End PHP file. save as droidtest.php


https://sites.google.com/site/notarazi/home/android/droidtest.php?attredirects=0&d=1


c. Prepare a secured connection PHP file, connection.php and save into the subfolder "secured" .


https://sites.google.com/site/notarazi/home/android/Connections.php?attredirects=0&d=1


d. Import the file AndroidMySql-tutorial.zip as new Android Project. Run and experiment this.
   Enter username "u@u.com" and password "pass".


Tuesday, April 24, 2012

Simple Way To Change VMDK Format To VDI Format for VirtualBox


Cara mudah menukar format VMDK kepada VDI bagi VirtualBox


Apabila perisian VirtualBox dipasang pada komputer, ia turut menyertakan program bantuan bernama VBoxManage. Program VBoxManage boleh menukar format virtual hard disk dengan mudah.

Langkah-langkah:
1) Cari lokasi VBoxManage, e.g., c:\Program Files\Oracle\VirtualBox\VBoxManage.exe
2) Cari lokasi fail VMDK yang anda mahu tukar formatnya, e.g. c:\Downloads\android 2\android 2\android.vmdk"
3) Dengan menggunakan Tetingkap Konsol (Console Window), pergi ke lokasi direktori (1).
4) Taipkan arahan 'Vboxmanage clonehd --format VDI "C:\Downloads\android 2\android 2\android.vmdk" c:\users\notarazi\android.vdi'
5) Uji fail VDI yang telah dihasilkan untuk mengesahkan fungsinya berjalan dengan baik.

Import Android Project


Simple Way To Create VMware Ubuntu virtual machine for Android development


Cara mudah mencipta Mesin Maya VMWare Ubuntu untuk pembangunan perisian Android


I’m currently gearing up to do some Android app development after making some headway through this helpful Android dev book, “Professional Android 2 Application Development.
I decided to create a small Ubuntu-based virtual machine that is dedicated solely to Android app development.  This gives me several benefits:
  • Small and clean environment dedicated only to Android development work.
  • Ability to create VM snapshots before undertaking any potentially destructive actions.
  • Extreme mobility by having the virtual machine files stored on my dropbox account so I can start up the development VM anywhere I go.
Here are the steps to create an Ubuntu virtual machine specifically for Android development.  Note: these instructions assume you already have some basic knowledge of Ubuntu and VMware workstation/fusion.

Pautan ke kandungan penuh: http://www.jaredlog.com/?p=1218


Eclipse build errors - java.lang.object cannot be resolved

PROBLEM:
The type java.lang.object "cannot be resolved" "Cannot find the class file" "refers to the missing type"

SOLUTION:

It sounds like this has been a known issue (Bug 67414).


Go to properties of project with the build error (right click > Properties)

View the "Libraries" tab in the "Build Path" section

Find the "JRE System Library" in the list (if this is missing then this error message is not an eclipse bug but a mis-configured project)

Remove the "JRE System Library"

Hit "Add Library ...", Select "JRE System Library" and add the appropriate JRE for the project (eg. 'Workspace default JRE')

Hit "Finish" in the library selection and "OK" in the project properties and then wait for the re-build of the project

Hopefully the error will be resolved ...

Crystal Reports


  1. http://www.vtc.com/products/Crystal-Reports-XI-Beginner-Tutorials.htm
  2. http://www.sdn.sap.com/irj/boc/go/portal/prtroot/docs/library/uuid/10597e9f-1579-2b10-54bb-87d6519a4d39?QuickLink=index&overridelayout=true&34153579943051
  3. https://www.sap.com/campaign/2010_curr_sap_crystal_reports_2008/WTY_2010_CURR_SAP_Crystal_Reports.epx?Level=1&FormResultID=520654e4-4ebf-44a0-998e-fb632ce7eaf5&ContinueURL=/campaign/2010_curr_sap_crystal_reports_2008/index.epx?kNtBzmUK9zU&kNtBzmUK9zU=1

Monday, April 23, 2012

Android Tutorial


http://developer.android.com/resources/tutorials/hello-world.html

Virtual Box - Import Pakej OVA Android Versi Ice Cream Sandwich


https://docs.google.com/document/pub?id=1-G3arwMMJ_VBaMI_oahufUs3Sz9m5N4D5o_jfsVf2No


VIRTUAL BOX – Langkah2 Import Pakej Virtual Android Versi Ice Cream Sandwich (4.0)
  1. VirtualBox adalah perisian Operating System Virtualization; maksudnya ia menjadi platform hos kepada perisian Operating System secara maya.
  2. VirtualBox boleh mengimport pakej os maya format “ova” dan membuat hard disk maya yang baru dari format “ova” ini.
  3. Katakan anda mahu mengimport pakej Android versi Ice Cream Sandwich format “ova” ke dalam VirtualBox, klik File/Import Appliance.... Browse di mana pakej “ova” tersebut berada dan klik OK.
  4. Berikutnya terdapat dua cara untuk menghidupkan Virtual Android; 1) Secara Bridged Adapter, 2) Secara Host-Only Adapter.


BRIDGED ADAPTER

  1. Bridged Adapter maksudnya, Virtual Android dihidupkan sebagai mesin tersendiri yang menumpang laluan (“bridge”) mesin host untuk berhubung dengan router dan mendapat IP NUMBER tersendiri.
  2. Bridged Adapter membolehkan Virtual Android berkomunikasi dalam rangkaian LAN dan rangkaian Internet.
  3. Klik “Enable Network Adapter”. Pilih “Bridged Adapter”. Pilih “Wireless Network Adapter”. Klik OK.

  1. Klik START.
  1. Apabila mesin maya ini hidup, ia akan mendapat IP NUMBER sendiri dari router. Mesin host dan mesin-mesin lain di dalam rangkaian ini boleh berhubung dengannya menggunakan IP NUMBER ini. Pastikan juga PORT 5555 mesin ini berstatus OPEN. Anda boleh gunakan program IPScanner untuk menyemak IP NUMBER dan PORT 5555.
  2. Bagaimana mahu menyemak konfigurasi ini? Dengan menggunakan mesin host, masuk ke console window.
  3. Taip “ipconfig” dan perhatikan bahagian “Wireless LAN adapter Wireless Network Connection”. Di dalam contoh di bawah, IP NUMBER untuk mesin host adalah 10.1.1.13, maka IP NUMBER mesin Virtual Android sudah pasti berada dalam kelompok IP yang sama.


HOST-ONLY ADAPTER
  1. Host-Only Adapter maksudnya, mesin Virtual Android ini dan mesin host bersambung di dalam rangkaian maya yang dikenali sebagai VirtualBox Host-Only Network.
  2. Host-Only Adapter membolehkan mesin Virtual Android berhubung terhad dengan mesinhost dan mesin-mesin lain yang hidup di dalamm VirtualBox sahaja. IP NUMBER bagi mesin Virtual Android dan mesin host hanya sah dan dikenali di dalamm rangkaian ini sahaja.
  3. Klik “Enable Network Adapter”. Pilih “Host-only Adapter”. Pilih “VirtualBox Host-Only Ethernet Adapter”.
  4. Klik START.
  5. Apabila mesin ini hidup ia akan mendapat IP NUMBER maya yang wujud bagi rangkaian VirtualBox Host-Only sahaja.
  6. Bagaimana mahu menyemak konfigurasi ini? Dengan menggunakan mesin host, masuk ke console window.
  7. Taip “ipconfig” dan perhatikan bahagian “Wireless LAN adapter Wireless Network Connection”. Di dalam contoh di bawah, IP NUMBER untuk mesin host adalah 192.168.56.1, maka IP NUMBER mesin Virtual Android sudah pasti berada dalam kelompok IP yang sama.


SEMAK IP NUMBER dan PORT NUMBER yang hidup
Anda boleh semak IP NUMBER dan PORT NUMBER yang hidup menggunakan perisian IP Scanner seperti IpScan.
  1. Hidupkan program IpScan.
  2. Masukkan Port 555 ke dalam senarai Port carian.
  3. Masukkan julat IP NUMBER yang betul, contohnya FROM 10.1.1.1 TO 10.1.1.255 atau FROM 192.168.56.1 TO 192.168.56.255
  4. Contoh output seperti berikut.
    Perhatikan IP NUMBER 10.1.1.7 mempunyai PORT 5555 yang sudah dibuka. Besar kemungkinan itulah mesin Virtual Android.

Saturday, April 21, 2012

Pengenalan Android


  1. Apakah Android?
  2. Komponen Android

1. Memasang perisian pembangunan Android
1.1. Untuk mrmbangunkan perisian Android, programmer memerlukan:
1.1.1. Android Software Development Kit (SDK)
1.1.2. Eclipse Integrated Development Environment (IDE)
1.1.3. Android Development Tools (ADT) untuk Eclipse.

2. Ikuti panduan langkah demi langkah untuk memasang perisian di atas.


  1. Installing Android and attaching it to Eclipse
  2. Installing Android ADK Offline
  3. Android Development using Eclipse and Android Virtual Machine
  4. Tutorial - Hello World

Tuesday, April 17, 2012

Free CMS Scripts to run on ASP.net

I came across these websites today (with the help of google search):
  1. kentico - http://www.kentico.com/Download-Demo/Free-CMS-for-ASP-NET?utm_source=google&utm_medium=cpc&utm_campaign=G_Free_Edition_Search

  2. monox - http://monox.mono-software.com/?gclid=CP2B9L6fvK8CFQ566wodEXlMhw

  3. http://umbraco.com/

I haven't got time to download and try them. Still busy with Liferay today. But obviously I must try them ASAP since my clients have been asking me about this for quite some time.

Sunday, April 08, 2012

Web Design & Development Using Joomla


Web Design & Development Using Joomla

1. Introduction To CMS and Joomla
1.1. Content Management System (CMS) is a system that creates, stores, manages and control distribution of digital contents.

1.2. Digital contents include html files, audio/video format file and other form of digital media.

1.3. Joomla is a popular CMS because it has worldwide community of users.

1.4. Steps to install Joomla:

1.4.1. Setup Apache Server, MySQL and PHP. (AMP)

1.4.2. Copy Joomla script (downloadable from joomla.org) to the root folder.

1.4.3. Setup Database and Database User.

1.4.4. Run install scripts.

1.4.5. Delete installation folder.


1.5. Web server often comes in a package such as AMP (Apache, MySQL and PHP; they are popular because they are open source programs.)

1.5.1. Apache is a web server; we need a web server to manage web page requests.

1.5.2. MySQL is a database server; we need a database server to store Joomla application setting and data.

1.5.3. PHP is a language processor/parser; we need PHP to process Joomla web page requests.

1.5.4. We also need a File Transfer Program (FTP) to help us transfer files from our computers to the web server computer.


1.6. When a web server runs on a host computer, the user of that computer can access its website via web browser by the address localhost, e.g. “http://localhost”.

1.7. If users from other computers wish to access that website, these users have got to know the address of the host computer; either by IP number or domain name for that host computer. e.g. “http://192.168.1.1/joomla” or “http://mydomain.com/joomla”.

1.8. Joomla provides access to its systems through :

1.8.1. Front-end; the page for normal users.

1.8.1.1. Normal users may read or write articles on Joomla website.

1.8.2. Back-end; the page for administrators.

1.8.2.1. Administrators manage the functions of the Joomla website.


2. Install Webserver Package (UsbWebserver)
2.1. Goto website usbwebserver.net and download the package. (at the time of this writing, current package is version 8.5)
2.2. Unzip the package to C:\. e.g. C:\usbw\{unzipped content here}
2.3. Run the file usbwebserver.exe and test ROOTDIR, LOCALHOST and PHPMYADMIN
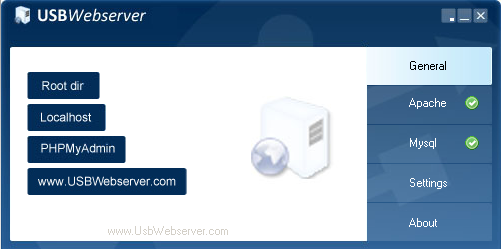
The above image shows the UsbWebServer Control Panel that will pop out when usbwebserver.exe runs. Test the server by clicking (1)“Root dir”, (2)“Localhost” and (3)“PHPMyAdmin” buttons.

Make sure that the Apache and MySQL signal is in green color. If it is red color, the server are not running, probably they have been blocked by the firewall program
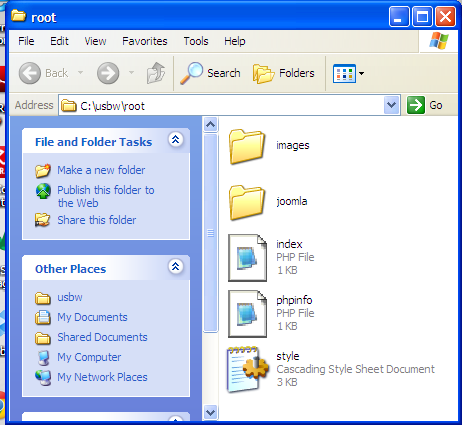
(1)”Root dir”. Windows Explorer shows the contents of the root directory of the webserver.

(2)”Localhost”. The start page of website powered by UsbWebServer. It indicates that the web server is running well.

(3)PhpMyAdmin. The login page for PhpMyAdmin (MySQL Database Front End). It indicates that MySQL is running well.


3. Install Joomla
3.1. Goto website joomla.org and download package. (at the time of this writing, current package is version 2.5)
3.2. Unzip the package to ROOTDIR (in step 2.3), e.g. C:\usbw\root\joomla\{unzipped content here}

The above image shows the “usbw” folder that is placed in C:\, i.e “c:\usbw\{unzipped content of usbwebserver here}”. Take note that in “usbw” there is a folder named “root”. This is the folder into which joomla package will be extracted, i.e “c:\usbw\root\joomla\{unzipped content of joomla package here}


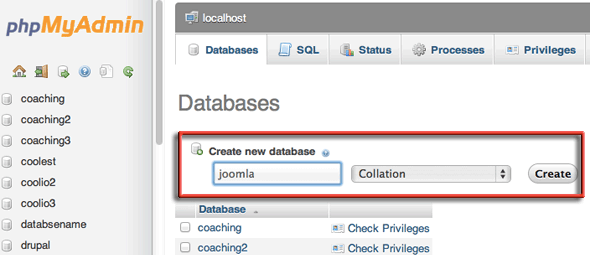
3.3. Goto PHPMYADMIN (http://localhost:8080/phpmyadmin).Create new Database, e.g. joomla. Create Database User, e.g. JoomlaAdmin. Keep details of Database Name and Database User/Password. It will be needed later during installation.


3.4. Using web browser, goto to http://localhost:8080/joomla/installation/index.php


3.5. Observe pre-installation check


3.6. Configure Database Connection.

3.7. Configure FTP connection.


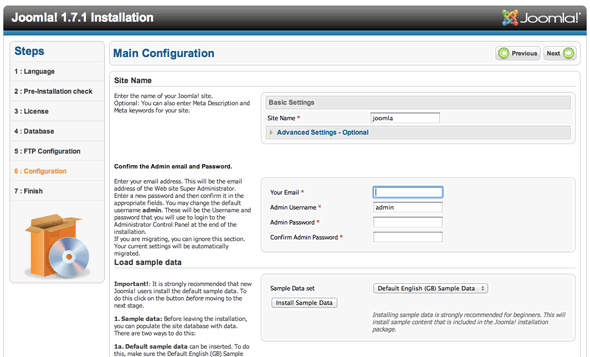
3.8. Configure Main Website.

3.9. Delete Installation Folder.


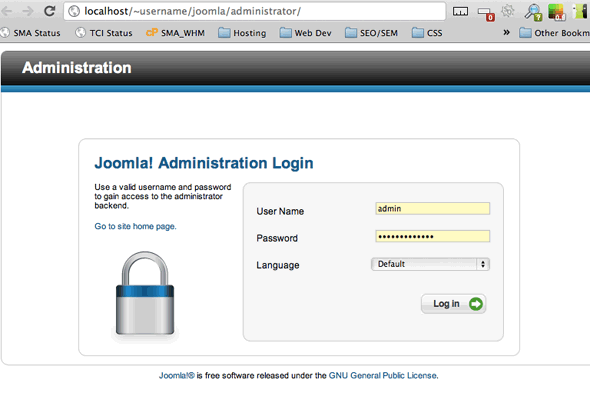
3.10. Test Administration Login.


4. Joomla Administration Page
For beginners, Joomla Administration Page provides the short cut buttons:

a. Add New Article

b. Article Manager

c. Category Manager

d. Media Manager

e. Menu Manager

f. User Manager

g. Module Manager

h. Extension Manager

i. Language Manager

j. Global Configuration

k. Template Manager

l. Edit Profile


4.4. The first thing that an Administrator would do normally is to change the layout of the Joomla website.

4.4.1. Administrator can set default template for site and administrator page by clicking “Template Manager” short cut button. The active template is denoted by star symbol in the column “default”.

4.4.2. Administrator may upload new template by clicking “Extension Manager” short cut button. There are a lot of free Joomla templates downloadable from websites like joomla24.com. These template packages are in the form of zipped file. Upload the file using “Extension Manager” page. Uploaded package will appear in “Template Manager” page.


4.5. To start publishing and sharing contents, Administrator may need to create users. It could be ordinary users, authors, administrators or other types. Users such as authors will be able to write article when they log in through the Front-End.

4.5.1. Articles can also be written through Administration Page. Click “Add New Article” Short Cut button to start writing article. Save the article when it is done.

4.5.2. Saved Articles will appear in the “Article Manager” page. This can be reached by clicking “Article Manager” short cut button.


4.6. Content may include multimedia file such as pictures. These can be uploaded to Joomla website using Media Manager.

4.6.1. Click “Media Manager” short cut button.